The basic form of this recipe comes from Joan Nathan's book The Jewish Holiday Kitchen (1988). I've baked it in three ways: in a tube pan (as written), in a bundt pan (be careful not to increase the amount of apples or the pan overflows!), and in a 13 by 9 inch cake pan. The bundt pan gives a pretty shape, but it's miserable to clean out; the "half sheet" cake pan is simplest, and should be done with two layers of each mixture, not three -- it's also easiest to serve from. And the tube pan is most authentic for a "Jewish holiday" look. Your choice.
Preheat the oven to 350 degrees. Grease the pan and dust it lightly with flour (important for the crust), tapping out any excess flour.
Peel and cut into thick slices 5 large apples (I like Cortland or Macs for this). Mix together 2 teaspoons of cinnamon and 1/3 cup sugar; pour over the apple slices and turn gently with a spoon until all the slices are sugared. Set aside.
Mix 3 cups flour (I use King Arthur Unbleached -- do not use cake flour) with 3 teaspoons baking powder and 1/2 teaspoon salt. Set aside.
In electric mixer, place 1-2/3 (one and two-thirds) cup sugar, 4 large eggs, 3/4 cup vegetable oil, 1/2 cup orange juice, and 1 teaspoon vanilla. Mix at medium speed until well blended.
Add the flour mixture and mix ONLY until blended. Scrape with spatula to make sure all flour's mixed in.
Pour one-third of batter into pan. Layer with one-third of apples-and-cinnamon-sugar. Repeat two more times, ending with apples on top.
Bake 90 minutes until golden on top. Let sit a few minutes and then, if using tube or bundt pan, unmold.
(Note: I use a two-piece tube pan, and because I'm awful at getting things out of pans intact, when my cake's baked I let it cool for 5 minutes, then loosen the outer part of the pan and remove it. I serve from the core of the pan, as shown in the photo. Or slice up, and plate the slices.)
Keeping it fresh: This cake won't keep for long. For a day or two, wrap it in plastic wrap or a plastic bag and keep at room temperature. For longer, it needs to be refrigerated. Past three days, it gets a bit mushy but is still yummy, especially warmed up with a dab of ice cream.
A workspace for cooks who think, contemplate, and enjoy life, with a special focus on how our cooking changes with our lives and history.
Welcome!
Welcome to Kitchen Revision ... a workspace for considering recipes and how they change, along with the cooks, the tasters, and the culture. I'm Beth Kanell, founder of Kitchen Revision. I love collecting and trying recipes -- and I'm endlessly interested in how history and culture shape us all. Plans for this space include co-authors, guest authors, plenty of discussion, and yummy diversions.
Showing posts with label recipe. Show all posts
Friday, September 14, 2018
Harvest Season: Apple Cake
Labels:
apple cake,
apples,
dairy-free,
Jewish,
Joan Nathan,
recipe,
Rosh Hashanah
Wednesday, November 26, 2014
A Different Holiday Treat: Pumpkin Coffee Cake
My husband is not a pumpkin pie fan, but I am -- yet making a pumpkin pie for one person is usually not smart, because the extra slices don't freeze well. But cake slices do! So this recipe has become one of my favorites. It's also easy to share slices or more, with neighbors. I've made a couple of changes to it over the years since 1990: I use yogurt instead of sour cream, because I'm more likely to have it around. And the original last layer of topping was a streusel with butter and nuts, and I've simplified it to just brown sugar. There's already plenty of butter in the cake, and nuts can be an issue with a lot of people that I like to give treats to.
PUMPKIN COFFEE CAKE
Preheat the oven to 330 degrees, and grease a 13 by 9 inch pan.
Into a small bowl, measure out and lightly crumble with fingers:
1/2 cup (packed) light brown sugar
In a medium bowl, mix with a fork:
1 can pumpkin (the 15-ounce size; about 2 cups)
1 egg
1/3 cup sugar
1 tsp cinnamon
1/2 tsp nutmeg
In another medium bowl, stir together:
2 cups flour
1 tsp baking powder
1 tsp baking soda
In large bowl, either by hand or with an electric mixer, cream togetherL
1/2 cup (1 stick) soft butter
3/4 cup sugar
1 tsp vanilla
Add to large bowl, one at a time and beating well:
3 eggs
Measure out:
1 cup yogurt or sour cream
Now, add the flour mix and the yogurt or sour cream, alternately, to the big bowl, in two or three stages, beating each time. You should have a nice light buttery batter.
Spread HALF of the batter in the greased pan. Gently, spread over this the pumpkin mix. Then "dollop" the rest of the batter on top (I do it with 12 evenly spaced spoonfuls). Using your fingers, sprinkle the brown sugar over the top as a last layer.
Bake for 50-60 minutes.
Cool to room temperature before serving.
NOTE: If you don't have yogurt or sour cream, this recipe can also be done with 1 cup milk, BUT you need to change the 1 tsp baking powder plus 1 tsp baking soda, to 2 tsp baking powder instead, if you use milk.
PUMPKIN COFFEE CAKE
Preheat the oven to 330 degrees, and grease a 13 by 9 inch pan.
Into a small bowl, measure out and lightly crumble with fingers:
1/2 cup (packed) light brown sugar
In a medium bowl, mix with a fork:
1 can pumpkin (the 15-ounce size; about 2 cups)
1 egg
1/3 cup sugar
1 tsp cinnamon
1/2 tsp nutmeg
In another medium bowl, stir together:
2 cups flour
1 tsp baking powder
1 tsp baking soda
In large bowl, either by hand or with an electric mixer, cream togetherL
1/2 cup (1 stick) soft butter
3/4 cup sugar
1 tsp vanilla
Add to large bowl, one at a time and beating well:
3 eggs
Measure out:
1 cup yogurt or sour cream
Now, add the flour mix and the yogurt or sour cream, alternately, to the big bowl, in two or three stages, beating each time. You should have a nice light buttery batter.
Spread HALF of the batter in the greased pan. Gently, spread over this the pumpkin mix. Then "dollop" the rest of the batter on top (I do it with 12 evenly spaced spoonfuls). Using your fingers, sprinkle the brown sugar over the top as a last layer.
Bake for 50-60 minutes.
Cool to room temperature before serving.
NOTE: If you don't have yogurt or sour cream, this recipe can also be done with 1 cup milk, BUT you need to change the 1 tsp baking powder plus 1 tsp baking soda, to 2 tsp baking powder instead, if you use milk.
Labels:
cake,
coffee cake,
pumpkin,
recipe,
sour cream
Sunday, April 13, 2014
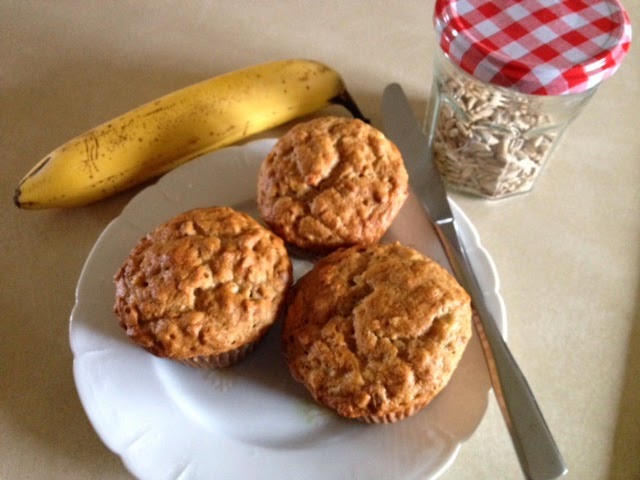
Sunflower Seed Muffins: Banana Oat Version, for a Rainy April Day
A couple of bananas were getting soft when I was scouting recipes last night, and I decided they'd go into morning muffins. I also wanted to experiment with sunflower seeds. Looking through recipes for the seeds, I noticed that some used "roasted" sunflower seeds, and some used raw. General consensus among the online nutrionists is, "Both raw and roasted seeds are nutritious and offer zinc, protein, folate, vitamin E and magnesium." Good deal, right?
I've had mixed results with toasting nuts in terms of timing and temperature, but it always brings out the flavor. I liked this process: Preheat the oven to 350ºF and sprinkle a single layer of sunflower seeds on a shallow baking pan. Pop into the oven and prepare to stir them regularly. The instructions I found said 30 minutes, but when I pulled out my seeds at 10 minutes to stir them, they were already clearly toasted and a quick taste confirmed they had become nicely crunchy. I definitely didn't want burned seeds, so ... I stopped at the 10-minute mark. After they cooled, I poured them into a clean lidded jar, as I had about a cup and knew I wouldn't be using them all the next morning.
Sunday morning, newspapers, coffee/tea, and baking: I used a standard banana muffin recipe here, with some extra cinnamon and nutmeg added; I only used 1 cup of unbleached flour (for a 12-muffin recipe, just under 2 cups is usual), plus 1/2 cup of rolled oats and 1/2 cup of oat flour, and I included 1/3 cup of toasted sunflower seeds.
Half an hour of baking at 350ºF was perfect. A nice treat for a rainy day, sweet with some crunch and lots of nutrition. Nope, it won't fit into the Paleo system that I'm also trying out ... but sometimes when an April shower strikes, it's better to be comfy and cozy anyway.
I've had mixed results with toasting nuts in terms of timing and temperature, but it always brings out the flavor. I liked this process: Preheat the oven to 350ºF and sprinkle a single layer of sunflower seeds on a shallow baking pan. Pop into the oven and prepare to stir them regularly. The instructions I found said 30 minutes, but when I pulled out my seeds at 10 minutes to stir them, they were already clearly toasted and a quick taste confirmed they had become nicely crunchy. I definitely didn't want burned seeds, so ... I stopped at the 10-minute mark. After they cooled, I poured them into a clean lidded jar, as I had about a cup and knew I wouldn't be using them all the next morning.
Sunday morning, newspapers, coffee/tea, and baking: I used a standard banana muffin recipe here, with some extra cinnamon and nutmeg added; I only used 1 cup of unbleached flour (for a 12-muffin recipe, just under 2 cups is usual), plus 1/2 cup of rolled oats and 1/2 cup of oat flour, and I included 1/3 cup of toasted sunflower seeds.
Half an hour of baking at 350ºF was perfect. A nice treat for a rainy day, sweet with some crunch and lots of nutrition. Nope, it won't fit into the Paleo system that I'm also trying out ... but sometimes when an April shower strikes, it's better to be comfy and cozy anyway.
Labels:
banana,
muffins,
oats,
recipe,
sunflower seeds,
toasting seeds
Sunday, November 24, 2013
Apple Pie for Breakfast: Updated to Challah French Toast with Apple Maple Compote
My sister Kit loved to be outrageous at age 10 (it maybe hasn't all worn off!) and was the first in our family to declare that she wanted pie for breakfast. And she got it!
Now it's apple season in my Vermont kitchen and I thought of Kit this morning while working on a vision of our usual Challah French Toast (the traditional egg-rich challah bread is especially good for soaking up the French toast egg-milk-vanilla blend) with an apple topping. It turned out the compote takes about 15 minutes, including the apple peeling, and it fits well with making the coffee, slicing the bread, beating up the French toast dunking mix (I use a blender to beat 5 eggs with a splash of milk and half teaspoon of vanilla, then pour into a pie pan and dip the sliced bread into it, before cooking with a smidgin of butter on a flat pancake grill).
Special credit to Marceau Sugaring of Peacham, Vermont, where we purchase our maple syrup.
Peel and slice (leaving out the cores) 5-7 apples, enough to make 4 cups of thick chunky slices.
In a saucepan over medium heat, melt 2 Tablespoons butter. Add the apples and sauté gently for 5 minutes.
Splash in 1/2 cup maple syrup, sprinkle with 1/2 teaspoon cinnamon and a dash of nutmeg, stir gently, and turn off the heat but let the pan sit there, keeping warm.
Now, make the French toast and add the compote on top. It's like warm apple pie for Sunday morning breakfast. Thinking of you, Kit!
Now it's apple season in my Vermont kitchen and I thought of Kit this morning while working on a vision of our usual Challah French Toast (the traditional egg-rich challah bread is especially good for soaking up the French toast egg-milk-vanilla blend) with an apple topping. It turned out the compote takes about 15 minutes, including the apple peeling, and it fits well with making the coffee, slicing the bread, beating up the French toast dunking mix (I use a blender to beat 5 eggs with a splash of milk and half teaspoon of vanilla, then pour into a pie pan and dip the sliced bread into it, before cooking with a smidgin of butter on a flat pancake grill).
Special credit to Marceau Sugaring of Peacham, Vermont, where we purchase our maple syrup.
APPLE MAPLE COMPOTE
Peel and slice (leaving out the cores) 5-7 apples, enough to make 4 cups of thick chunky slices.
In a saucepan over medium heat, melt 2 Tablespoons butter. Add the apples and sauté gently for 5 minutes.
Splash in 1/2 cup maple syrup, sprinkle with 1/2 teaspoon cinnamon and a dash of nutmeg, stir gently, and turn off the heat but let the pan sit there, keeping warm.
* * *
Now, make the French toast and add the compote on top. It's like warm apple pie for Sunday morning breakfast. Thinking of you, Kit!
Labels:
apple,
breakfast,
challah bread,
cooking,
French toast,
maple,
recipe,
Vermont
Tuesday, November 30, 2010
Challah: Where the Baking Begins for Babka
![]() |
| twin baked loaves (one for home, one for a friend) |
The secret to my best babka recipe is crumbs of challah bread. This is so essential that I can't bake babka without first baking challah! So that's where I'm starting today.
Challah is the Jewish egg bread, served with many a shabbat meal and at significant holiday meals (but NEVER during Passover, which is a yeast-free season of the Jewish calendar). Although I used a couple of recipes from Jewish cookbooks, I settled for reliability and flavor on a very slightly adapted version of the "Rich Egg Bread" recipe on Gold Medal Flour bags. Here's my usual version:
2 T dry yeastStir the sugar and yeast into the warm water in a large bowl (I use a big plastic Tupperware one in which I can knead). Let "proof" for 5 minutes. Then stir the salt, eggs, oil (and butter if being used), and 4 cups of flour. Switch from your wooden spoon to a plastic dough scraper (if you don't have one, use your hands) and work in another cup of flour. If it's REALLY sticky, add the final half cup of flour. Keep it as soft as possible, though.
1-1/3 cups warm water (warm enough for a baby's bottle)
2 T light brown sugar (white will do if you don't have the brown, but the flavor's better with brown)
1 T salt
3 eggs, lightly beaten
3 T oil plus, if NOT for a Jewish meat meal, add 1 T soft or melted butter
5 to 5-1/2 cups unbleached white flour
2 T more oil at end of kneading
1 egg more before baking, beaten
Using the scraper, I knead the dough for about a minute in the bowl, until it rounds up nicely (sometimes I use a few tablespoons more flour in the process). Add the extra 2 T of oil to the bowl and roll the ball of dough in it. Cover the bowl and let the dough rise for half an hour to an hour, in a warm place. It's best if only doubled in size, however long that takes -- overdoing the rising makes the dough hard to handle.
Dump out the dough onto a lightly floured surface and divide it in three segments; gently roll these (no stretching!) into three "ropes" and braid them, making sure to fasten them together snugly at each end. Place on a well-greased sheet pan (insulated is best!) or parchment-lined pan. Turn on the oven and let it preheat to 400 degrees F. By the time the oven is warm enough, the loaves have usually risen, although it doesn't hurt to let them rise an extra 10-15 minutes more, if there's time in your schedule.
Take the last egg and using a soft brush, or a strip of paper toweling, or your fingers, lightly brush the beaten egg onto the loaf. I always have some left at the end, which I dump into a pet dish or down the drain.
Make sure the oven rack is in the middle position. Add the bread and bake for 30 minutes; check that it sounds hollow when tapped on the bottom (if you're not sure, give it 5 minutes more).
Often, I divide this recipe to make two smaller braids, in which case they are done at about 25 minutes, and I have one for a friend and one for home.
Variations: (1) After brushing the risen loaf with egg, sprinkle with sesame or poppy seeds. (2) If you have leftover mashed potato without large lumps, work in a half cup when you're putting together the dough; the flavor is great and it may yield a moister loaf. (This came from Lore Steinitz's mother.) If the mashed potatoes are very cold, warm them to room temperature using a microwave if possible, so you don't slow down the rising process. (3) Make rolls instead of braids, by cutting balls about the size of a small plum, rolling into a short rope, and twisting into an overhand knot. This shape rises beautifully. Cut the baking time to 15 minutes or so.
One more secret: You can make the dough the night before, and let it rise in the refrigerator, with the bowl covered to prevent drying out. Then shape the loaves from the cold dough, and give them 45 minutes to rise. A nice time-saver for hectic days, and the grain of the loaf is especially even when done this way.
Last but not least: If you forget to brush the loaf with egg before baking it, don't worry. It just won't be as glossy. Try it both ways and see which you prefer. And yes, you can substitute half whole wheat flour in this recipe, but my husband hates it that way.
Important note about the last of the loaf: If you possibly can, save six slices for morning French toast -- challah makes the best! (I've even been known to slice an entire loaf to freeze for future breakfasts.) And, if you want to make babka, crumble a couple of slices to make a cup of Challah Bread Crumbs and pop those in the freezer, too! More on this, soon.
Subscribe to:
Posts (Atom)